摘要 分别使用java和python实现mcp server并注册到nacos中,并通过roo code使用。
使用docker-compose安装nacos 配置 3.0+版本以上的nacos需要配置NACOS_AUTH_IDENTITY_KEY等,参考官方手册配置即可
1
2
3
4
5
6
7
8
9
10
11
12
13
14
15
16
17
services: nacos: image: nacos/nacos-server:latest container_name: nacos-standalone environment: - PREFER_HOST_MODE=hostname - MODE=standalone - NACOS_AUTH_IDENTITY_KEY=serverIdentity - NACOS_AUTH_IDENTITY_VALUE=security - NACOS_AUTH_TOKEN=VGhpc0lzTXlDdXN0b21TZWNyZXRLZXkwMTIzNDU2Nzg= volumes: - ./standalone-logs/:/home/nacos/logs - ./init.d/custom.properties:/home/nacos/init.d/custom.properties ports: - "8080:8080" - "8848:8848" - "9848:9848"
启动 org-language 使用 Spring AI Alibaba Nacos MCP 框架开发 MCP Server 依赖引入 1 2 3 4 5 6 7 8 9 10 11 12 13 14 15 16 17 18 19 20 21 22 23 24 25 <dependency> <groupId>com.alibaba.cloud.ai</groupId> <artifactId>spring-ai-alibaba-starter-nacos-mcp-server</artifactId> <version>1.0.0.1</version> <exclusions> <exclusion> <artifactId>commons-logging</artifactId> <groupId>commons-logging</groupId> </exclusion> </exclusions> </dependency> <!-- MCP Server (WebMVC) --> <dependency> <groupId>org.springframework.ai</groupId> <artifactId>spring-ai-starter-mcp-server-webmvc</artifactId> <version>1.0.0-RC1</version> </dependency> <dependency> <groupId>ch.qos.logback</groupId> <artifactId>logback-classic</artifactId> <version>1.5.18</version> </dependency>
服务定义 实现一个获取天气信息的tool
1
2
3
4
5
6
7
8
9
10
11
12
import org.springframework.ai.tool.annotation.Tool;import org.springframework.ai.tool.annotation.ToolParam;import org.springframework.stereotype.Service;@Service public class WeatherService { @Tool(description = "Get weather information by city name") public String getWeather (@ToolParam(description = "City name") String cityName) { return "Sunny in " + cityName; } }
自动注册参数配置 1 2 3 4 5 6 7 8 9 10 11 12 13 14 15 16 17 18 19 20 server: port: 8081 spring: application: name: springboot-nacos-mcp ai: mcp: server: name: webmvc-mcp-server version: 1.0 .0 type: SYNC alibaba: mcp: nacos: server-addr: localhost:8848 namespace: public username: nacos password: nacos registry: enabled: true
服务启动 1 2 3 4 5 6 7 8 9 10 11 12 13 14 15 16 17 18 19 20 21 22 23 24 25 26 27 28 29 30 31 32 33 34 import com.example.demo.service.WeatherService; import org.springframework.ai.tool.ToolCallbackProvider;import org.springframework.ai.tool.method.MethodToolCallbackProvider;import org.springframework.boot.SpringApplication;import org.springframework.boot.autoconfigure.SpringBootApplication;import org.springframework.context.annotation.Bean;@SpringBootApplication public class Application { public static void main (String[] args) { SpringApplication.run(Application.class, args); } @Bean public ToolCallbackProvider weatherTools (WeatherService weatherService) { return MethodToolCallbackProvider.builder().toolObjects(weatherService).build(); } }
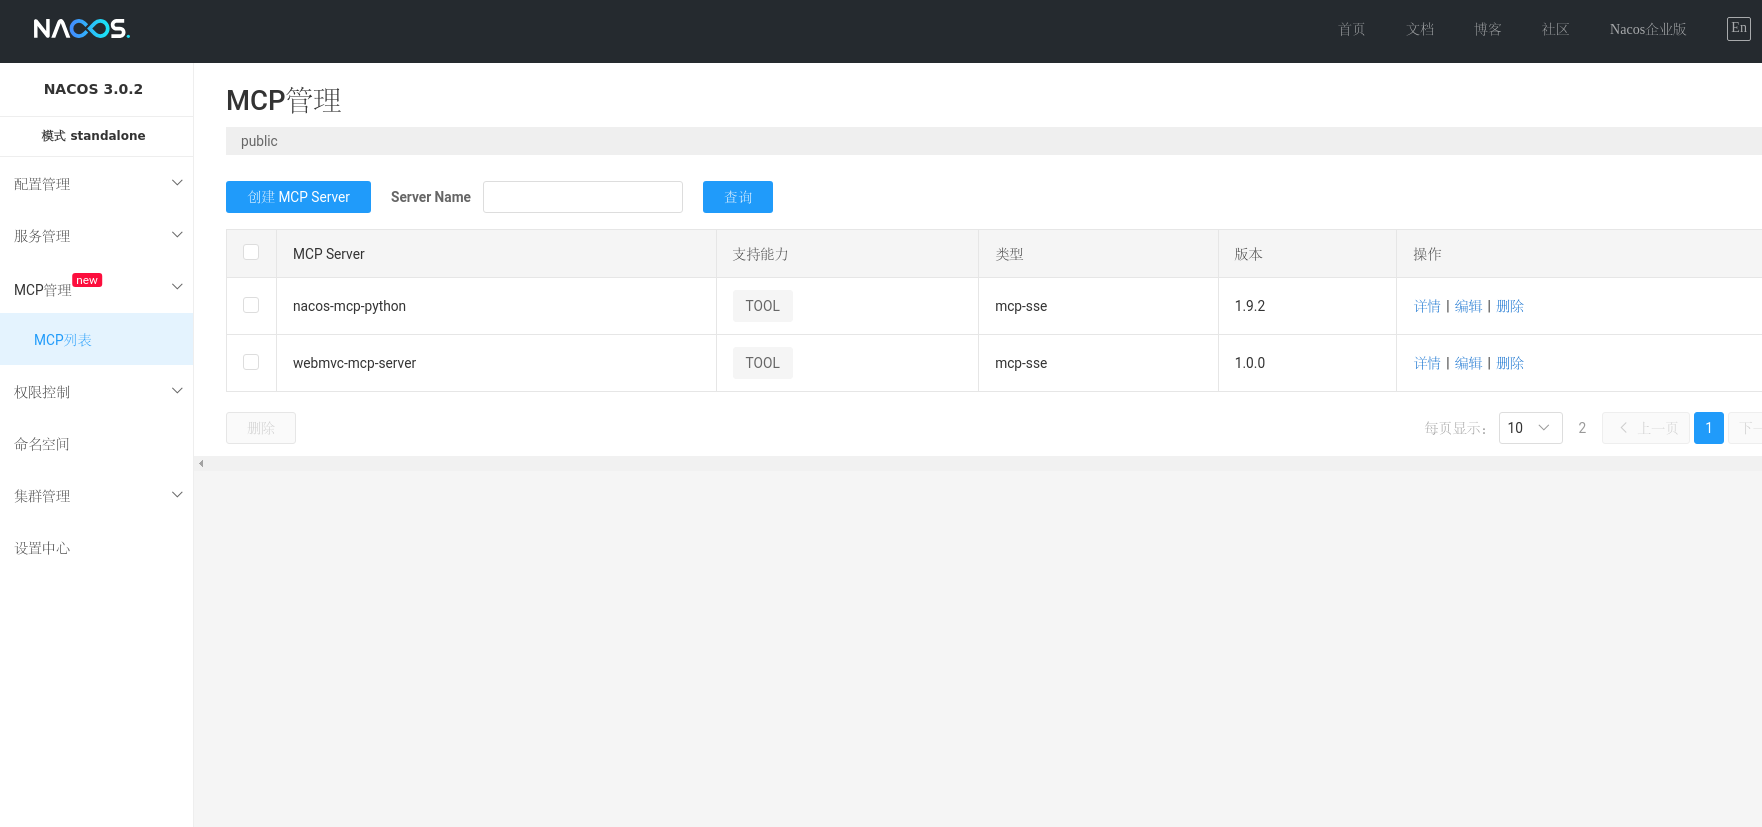
在nacos中查看注册情况 查看mcp列表
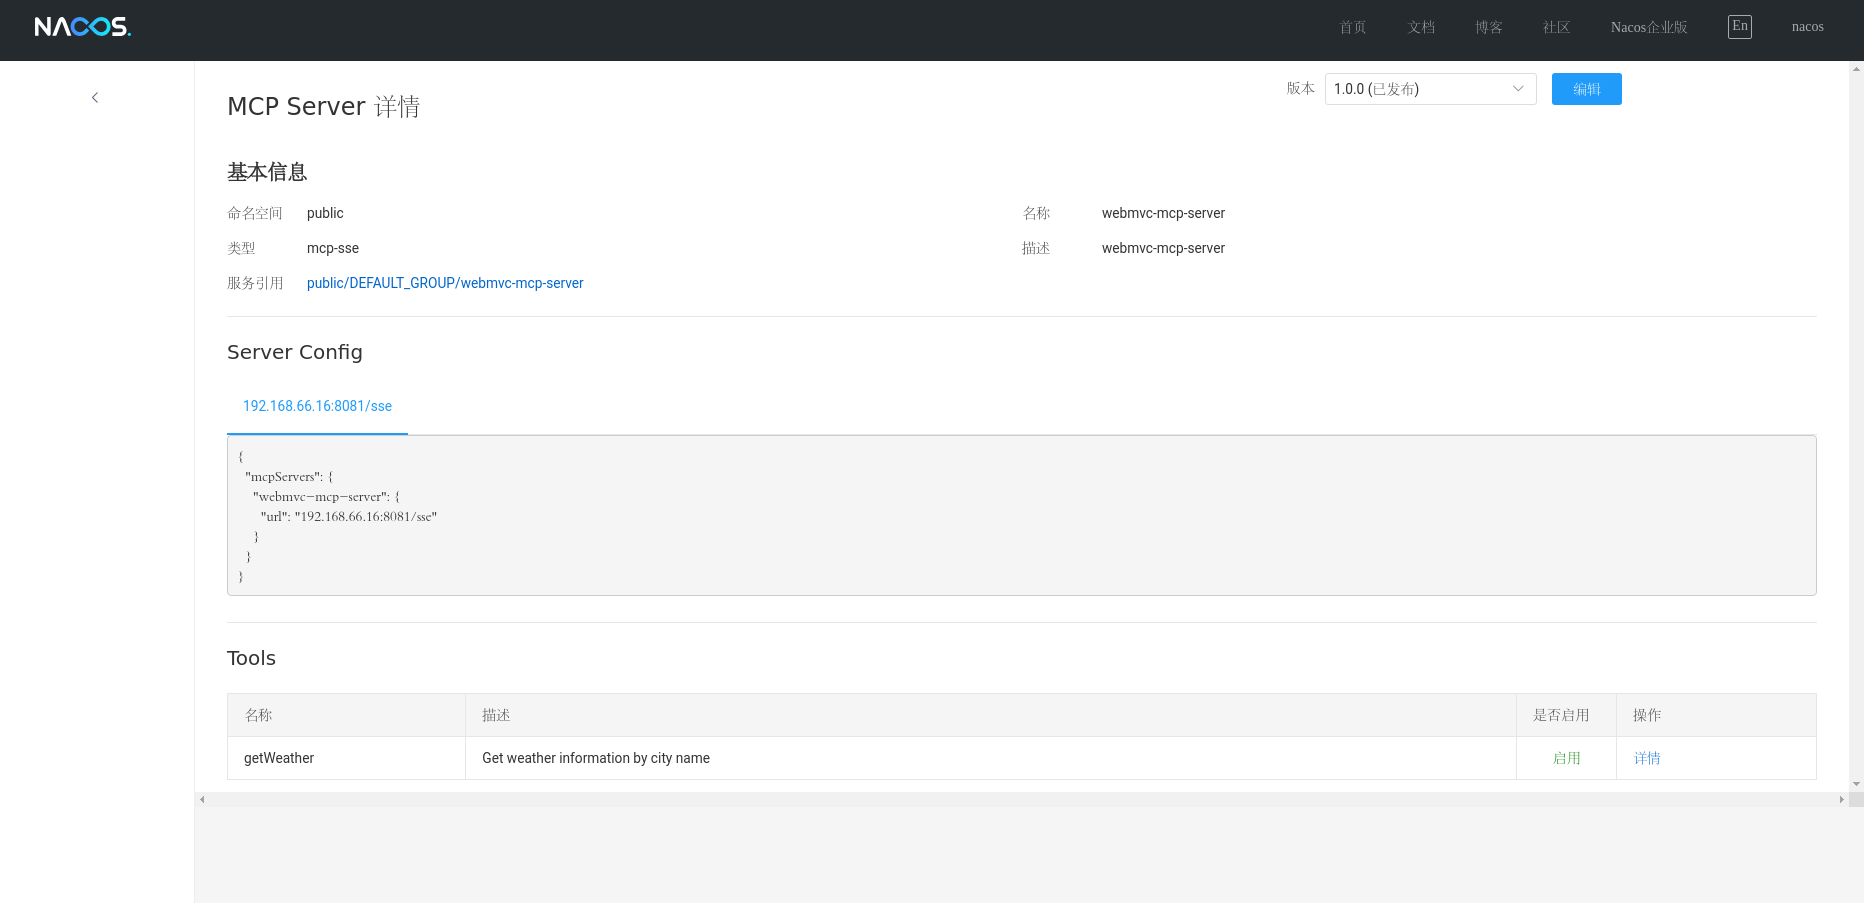
mcp server详情
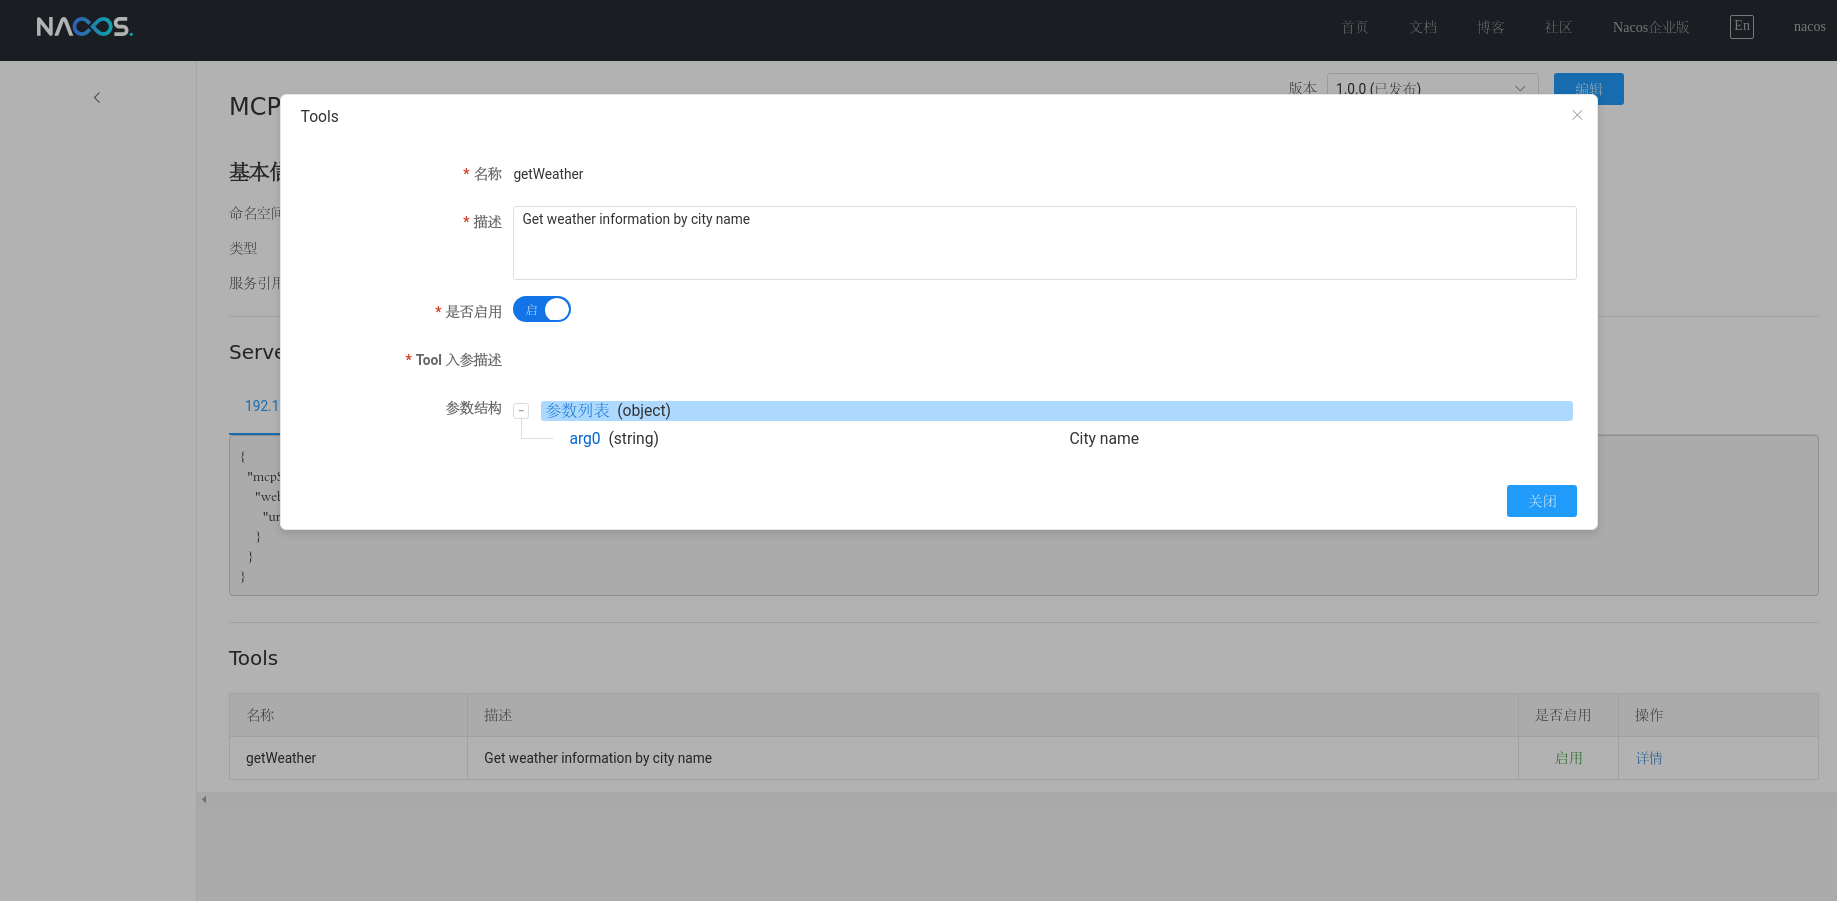
动态变更工具开关 MCP Server 自动注册到 Nacos 之后,可以在控制台上动态变更 MCP Server
使用 Nacos MCP Wrapper Python 开发 MCP Server 环境准备 1 2 pip install nacos-mcp-wrapper-python
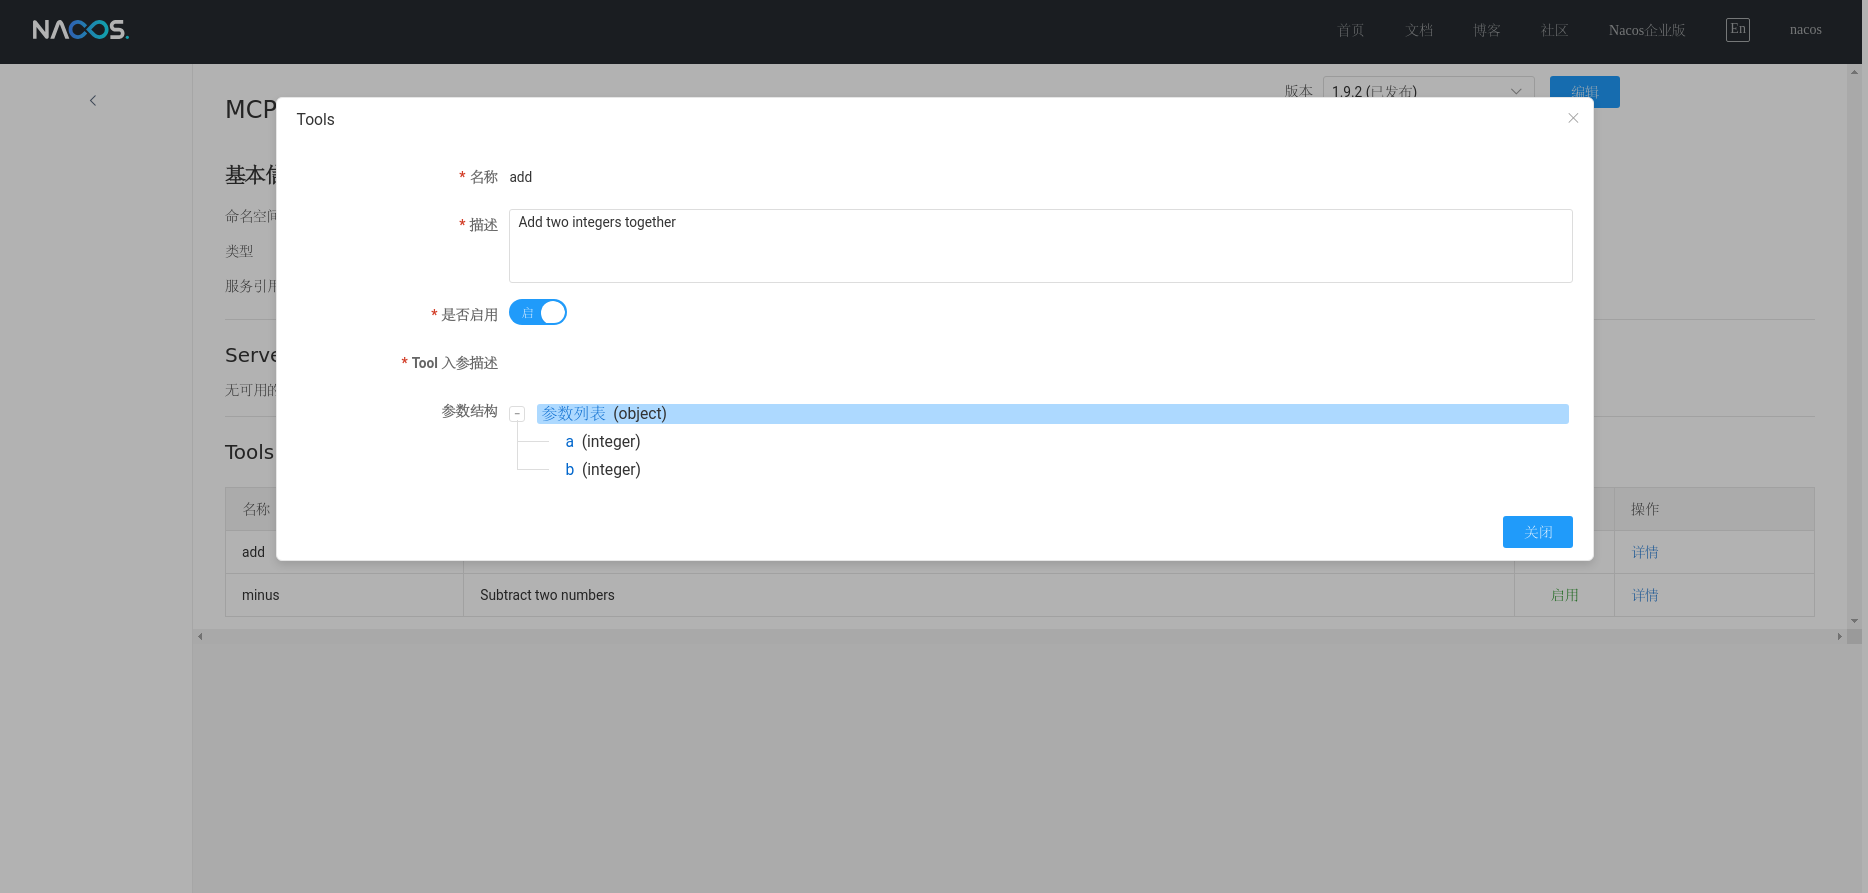
代码编写 1 2 3 4 5 6 7 8 9 10 11 12 13 14 15 16 17 18 19 20 21 22 23 24 25 26 27 28 29 30 31 32 33 34 35 36 37 38 39 40 41 """ 使用nacos注册的mcp server "nacos-mcp-python": { "url": "http://localhost:18001/sse", "type": "sse", "alwaysAllow": [], "disabled": false }, """ from nacos_mcp_wrapper.server.nacos_mcp import NacosMCPfrom nacos_mcp_wrapper.server.nacos_settings import NacosSettingsnacos_settings = NacosSettings() nacos_settings.SERVER_ADDR = "127.0.0.1:8848" nacos_settings.USERNAME="nacos" nacos_settings.PASSWORD="nacos" mcp = NacosMCP("nacos-mcp-python" , nacos_settings=nacos_settings, port=18001 ) @mcp.tool() def add (a: int , b: int ) -> int : """Add two integers together""" return a + b @mcp.tool() def minus (a: int , b: int ) -> int : """Subtract two numbers""" return a - b if __name__ == "__main__" : try : mcp.run(transport="sse" ) except Exception as e: print (f"Runtime error: {e} " )
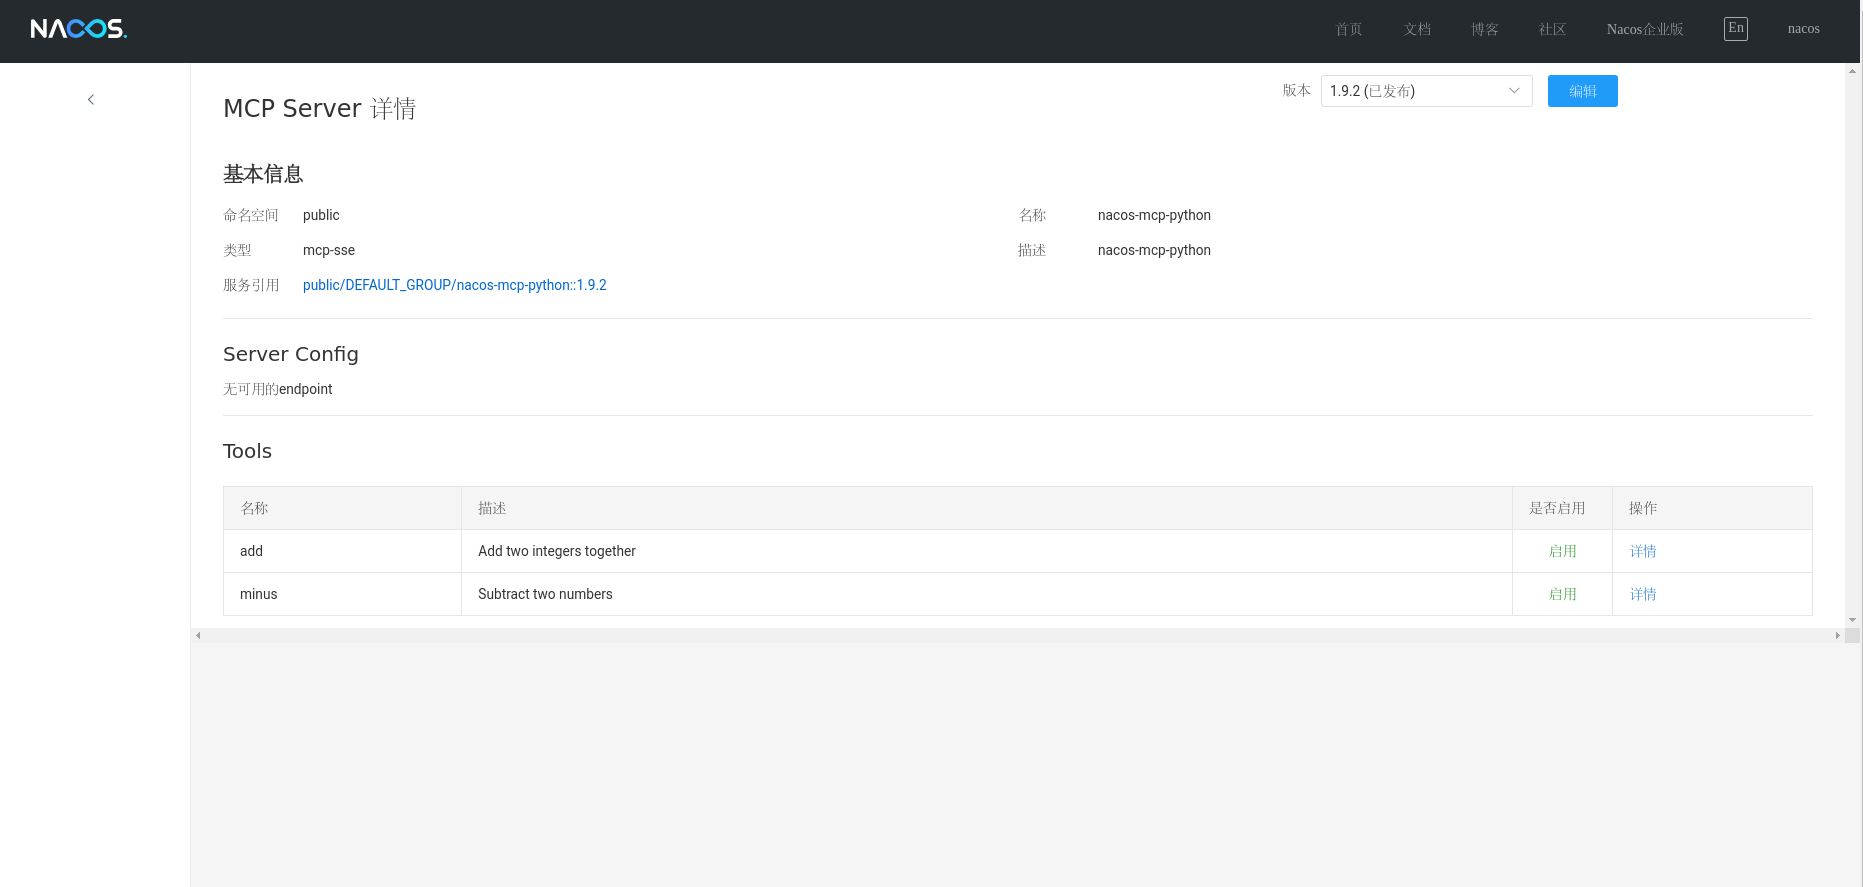
在nacos中查看注册情况 查看mcp列表
mcp server详情
动态变更工具开关 MCP Server 自动注册到 Nacos 之后,可以在控制台上动态变更 MCP Server
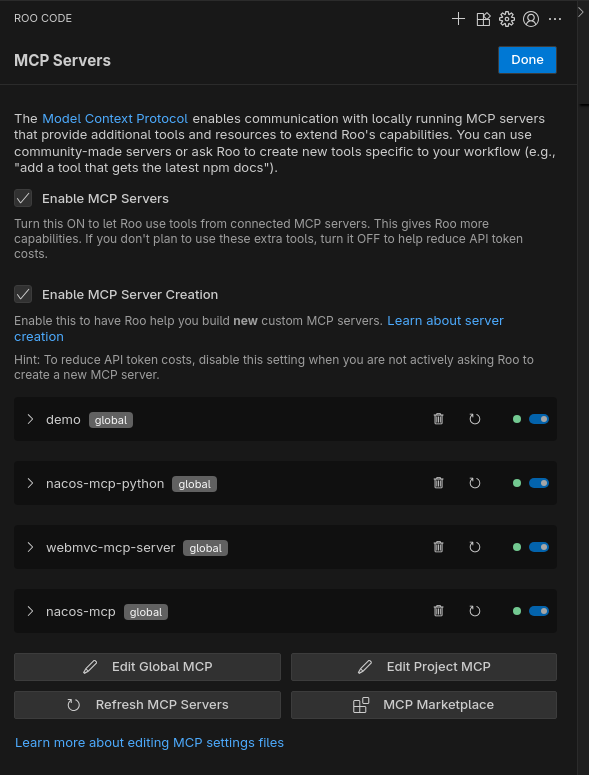
在RooCode插件中配置MCP 配置 在mcp_setting.json文件中配置自己的server
1 2 3 4 5 6 7 8 9 10 11 12 13 14 15 16 { "mcpServers": { "nacos-mcp-python": { "url": "http://localhost:18001/sse", "type": "sse", "alwaysAllow": [], "disabled": false }, "webmvc-mcp-server": { "url": "http://localhost:8081/sse", "type": "sse", "alwaysAllow": [], "disabled": false } } }
检查是否成功 配置完成后,mcpServer会显示绿色图标,如下
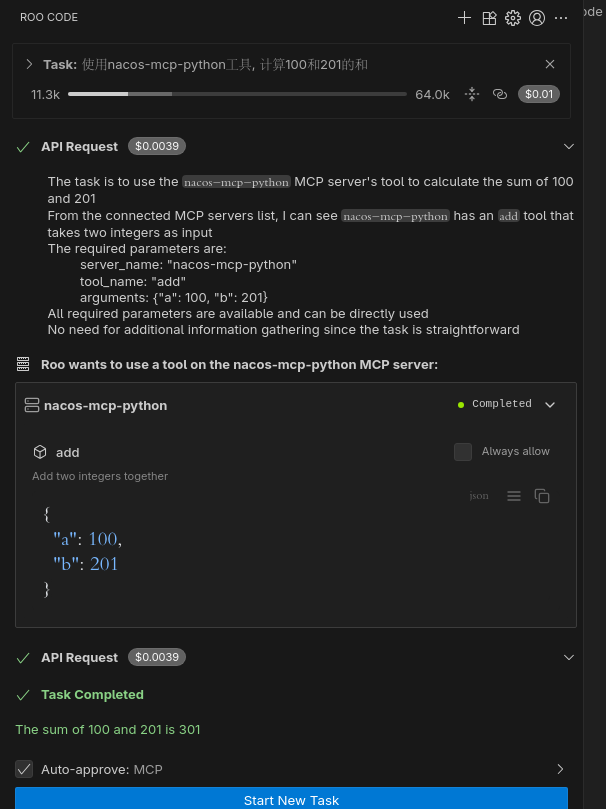
测试 求和 使用demo工具, 计算100和201的和, 效果如下
查看天气
代码地址 https://github.com/zhaozhiwei1992/python/tree/master/demo/llm/mcp
https://github.com/zhaozhiwei1992/demo/tree/master/springboot/springboot-nacos-mcp
参考 https://nacos.io/docs/latest/manual/user/ai/mcp-auto-register/?spm=5238cd80.2ef5001f.0.0.3f613b7cth6gs3